Configure Azure Firewall Premium features for AVD automated
Security became important more and more. It is recommend, now the days arrived where the most people work from home and IT is moving to the public cloud, to use a good firewall with less complexity as possible. In case of AVD within the current situation an IT environment can be complex. In this article I will explain how configure an Azure Firewall for AVD automated with premium options, which came in public preview at 16 February 2021. At the end I will show how to deploy an Azure Firewall specially for a AVD environment with all the needed steps automated.
The most IT environments has a firewall at the office where you have to connect to first by VPN, IPSEC or something. From there you will be able to connect to the public cloud from the office. Properly with an another VPN or express route.
Table Of Contents
What is new in Azure Firewall Premium
First thing which is good to know is the difference between the standard options and the premium options. Of course the price will increase but I am a tech guy so I will skip the pricing aspect.
Another important thing is the Microsoft’s SLA over the public features. Because it is still in public preview, not general available, it is recommended to keep it for test purposes for now.
 That said it is now time to look at the new features.
Transport Layer Security (TLS) Inspection
Azure Firewall Premium terminates outbound and east-west TLS connections. Inbound TLS inspection is supported in conjunction with Azure Application Gateway allowing end-to-end encryption. Azure Firewall performs the required value-added security functions and re-encrypts the traffic which is sent to the original destination
Intrusion Detection and Prevention System (IDPS)
This new feature will help you monitor the network for malicious activity, will log these information, report about it and if configured it will block traffic. This can be very useful in a AVD environment since users will have the ability to install software in the host, which can be malicious.
URL Filtering
As the name says it can filter URLs and will block the page if needed. In relation to the standard option this filter has the possibility to filter parts of an URL like rozemuller.com/pages/testpage instead of filtering the whole page based on FQDN like rozemuller.com.
Web categories
By configuring web categories you will be able to deny access to websites based on a category like social media or gambling. The standard feature also has this option. Difference between standard and premium in this case is the premium firewall will categorize a page based on the full URL where the standard firewall will check the FQDN part only.
Based on the new features, in case of an end user environment like AVD, I think blocking specific URL’s will make things unnecessary complex. This because most of the web pages will fully represents a category. The inspection, detection and prevention features are really valuable protecting and end user environment.
More information about these features check the Azure Firewall Premium features overview
Azure Firewall architecture
Before automating things it is good to know how things are working. At first we all know a firewall is essential in every IT network. It will keep you network safe from hack attacks from outside your network. An Azure Firewall does the same like any other firewall.
When configuring the Azure Firewall through the portal you will be asked in the first part for some basics like a name, region and resourcegroup. The next part is where you can setup the firewall. In this case we will create a new firewall and will choose the Premium tier.

Firewall policy
Every firewall has at least one policy called a Firewall Policy. Firewall Policy is an Azure resource that contains NAT, network, and application rule collections, and Threat Intelligence settings. It’s a global resource that can be used across multiple Azure Firewall instances in Secured Virtual Hubs and Hub Virtual Networks. Policies work across regions and subscriptions.
In the deployment later I will create several rule collections. Every rule collection represents rules with the same type, priority and action.
Subnet
The following step is connecting the firewall to a virtual network. This is the virtual network which the Azure Firewall will protect. Good to know is that the firewall needs an own subnet called AzureFirewallSubnet.
In the automation chapter I will use an existing VNET based on the AVD environment, but will create the needed subnet.

Public IP
The next step is the public IP. This is the IP which is representing your internal network on the internet.
More information about the Azure Firewall features please check the feature list.
Azure Firewall for AVD Automated
Now we know which components we need it is time to deploy an Azure Firewall for AVD automated.
At the end of this chapter we have an Azure Firewall configured specially for a AVD environment. This means we have configured the new premium features and also added some rule to keep in contact with Microsoft. This is needed to stay supported.
In this first part I will deploy a premium firewall with PowerShell. As I mentioned before you will need information like a VNET and public IP.
Gather VNET information
Because I will create a firewall in an existing VNET I will gather all that information which will serve as the basic information. Good to now that a firewall must be placed in the same resource group as the VNET.

$VirtualNetworkName = 'vnet-avd-acc-westeu-001'
$VirtualNetworkResoureGroup = 'rg-avd-acc-001'
$networkInfo = Get-AzVirtualNetwork -Name $VirtualNetworkName -ResourceGroupName $VirtualNetworkResoureGroup
Add AzureFirewallSubnet
Now we have the network information the first step is creating the needed AzureFirewallSubnet. In the first place I will add the subnet in memory then I will commit it to the virtual network.
Good to know is that the subnet needs at least a /26 range.
$networkInfo | Add-AzVirtualNetworkSubnetConfig -Name AzureFirewallSubnet -AddressPrefix 10.2.0.192/26
$networkInfo | Set-AzVirtualNetwork
Deploy public IP
The next step is configuring deploying a public IP. This is the external IP which is representing your network on the Internet.
To avoid long commands first I will create a parameter table with all need information. As you can see the $networkinfo variable is used to deploy the public IP in the same region and resourcegroup. I will store the results in the $FWpip variable because we will need it in the next step.
$FirewallPip = @{
    Name = "fw-avd-pip-001"
    Location = $networkInfo.location
    AllocationMethod = "Static"
    Sku = "Standard"
    ResourceGroupName = $networkInfo.Resourcegroupname
}
$FWpip = New-AzPublicIpAddress @FirewallPip
Deploy Azure Firewall Premium
Now the public IP is set we are able to deploy the firewall. In this parameter table I’m also using the $networkinfo again and the $FWpip from the previous step.
Make a notice about the SkuTier which is set to Premium. Because “Standard” is default you will have to set this value.
$firewallParameters = @{
    Name = "fw-premium-avd"
    Location = $networkInfo.location
    PublicIpAddress = $FWpip
    VirtualNetwork = $networkInfo
    ResourceGroupName = $networkInfo.Resourcegroupname
    SkuTier = "Premium"
}

# Create the firewall
$Azfw = New-AzFirewall @firewallParameters
 Now the firewall is deployed it is time the configure a firewall policy.
Firewall Policy for AVD
A firewall policy is an Azure resource that contains NAT, network, application rule collections, and Threat Intelligence settings. It’s a global resource that can be used across multiple Azure Firewall instances in Secured Virtual Hubs and Hub Virtual Networks. Policies work across regions and subscriptions.
In my case I will create a firewall policy for a AVD environment and will add it to the just created firewall. To make things clear a firewall policy is a independent Azure resource itself. After creating you have to ‘connect’ it to the firewall.
Lets create a policy first. In the parameters below I’m using the networkInfo again, also make a notice about the ‘Premium’ tier. Otherwise is standard and you will not have the new premium features.
Enable TLS Inspection
TLS inspection needs an Azure Key Vault with a valid certificate which is used to encrypt the data before it is send to the destination. You will need to enable TLS inspection first before you are able to use it within the application rules.
The code below will create a new Key Vault, a managed identity and will add it as a Reader to the Key Vault. This identity is used later when configuring TLS in the policy.
Create an Azure Key Vault
Before enabling TLS you will need a valid certificate stored in an Azure Key Vault. With the code below you will create a new empty Key Vault with the correct permissions.
$KeyVaultSettings = @{
    Name = 'kv-firewall-tls'
    ResourceGroupName = $networkInfo.Resourcegroupname
    Location = $networkInfo.location
}

$AzKeyVault = New-AzKeyVault @KeyVaultSettings
$KvManagedId = New-AzUserAssignedIdentity -ResourceGroupName $networkInfo.Resourcegroupname -Name fw-managedid-tls
$objectId = Get-AzADServicePrincipal -DisplayName $KvManagedId.Name
$AzKeyVault | New-AzRoleAssignment -RoleDefinitionName "Reader" -objectId $objectId.Id
$AzKeyVault | Set-AzKeyVaultAccessPolicy -objectId $objectId.Id -PermissionsToCertificates "Get","List" -PermissionsToSecrets "Get","List"
Now the Key Vault is in place and a managed identity all the needed information is present to fill in later.
The next step is creating a certificate and import it into the Key Vault. Mention the NotAfter which must be at least 12 months. In my demo I used a self signed certificate. Make sure your clients trust the root and will have the client certificate installed.
$CertParameters = @{
    Subject = "AVD Intermediate CertAuthority"
    FriendlyName = "AVD Intermediate CertAuthority"
    CertStoreLocation = 'cert:\LocalMachine\My'
    DnsName = "avd.experts"
    KeyAlgorithm = "RSA"
    HashAlgorithm = "SHA256"
    KeyLength = 4096
    KeyUsage = @("CertSign","DigitalSignature")
    KeyUsageProperty = "Sign"
    NotAfter = (Get-Date).AddMonths(36)
    TextExtension = @("2.5.29.19 = {critical} {text}ca=1&pathlength=1")
}

$Cert = New-SelfSignedCertificate @CertParameters
$CertPassword = ConvertTo-SecureString -String "avd_demo_pass@!" -Force –AsPlainText
$Cert | Export-PfxCertificate -FilePath "C:\avd-intermediate.pfx" -Password $CertPassword
$tlsCert = $AzKeyVault | Import-AzKeyVaultCertificate -Password $CertPassword -Name 'avd-intermediate-cert' -FilePath "C:\avd-intermediate.pfx"
More information about premium certificates check https://docs.microsoft.com/en-us/azure/firewall/premium-certificates
Enable IDPS
Enabling IDPS in basics is quite simple. In my example I only just setup an alert by executing the code below.
$IdpsSettings = New-AzFirewallPolicyIntrusionDetection -Mode "Alert"
Deploy the firewall policy
Now every step is in place we are able to create the premium policy with TLS and IDPS enabled.
$AzFwPolicySettings = @{
    Name = 'fw-policy-avd-premium'
    ResourceGroupName = $networkInfo.Resourcegroupname
    Location = $networkInfo.location
    SkuTier = "Premium"
    TransportSecurityName = "tls-avd"
    TransportSecurityKeyVaultSecretId = $tlsCert.SecretId
    UserAssignedIdentityId = $KvManagedId.Id
    IntrusionDetection = $IdpsSettings
}

$AzFwPolicy = New-AzFirewallPolicy @AzFwPolicySettings
At the moment of writing it looks like there is a bug with PowerShell in combination with the Azure portal. However you are creating a premium policy in the portal the policy is characterized as standard. In the policy itself the SKU is premium.


Configuring the AVD policy
Before configuring the policy it is good to know how a policy is built up. To keep things clear is it recommended using groups called ‘collections’. In the firewall policy blade in the menu on the left side you see an option Rule Collections. Within that option you are able create different collection types, Application, DNAT and Network.
Matching the portal to PowerShell commands in this case took some time.
Every rule collection has the same type of rules, priority and action. It is not possible to create an allow and deny rule in the same collection. With that in mind I will create for every type a new collection rules.
Good to know is that you have to create collection rules with PowerShell.
URL Filtering
There are several commands for creating collections. In my first test flight I used the most likely command New-AzFirewallApplicationRuleCollection. It worked but this one will create a classic collection instead a policy collection.
To take benefit of the premium features you will need the premium policy. The next one I tried was the New.AzFirewallPolicyFilterRuleCollection. That one did the trick.


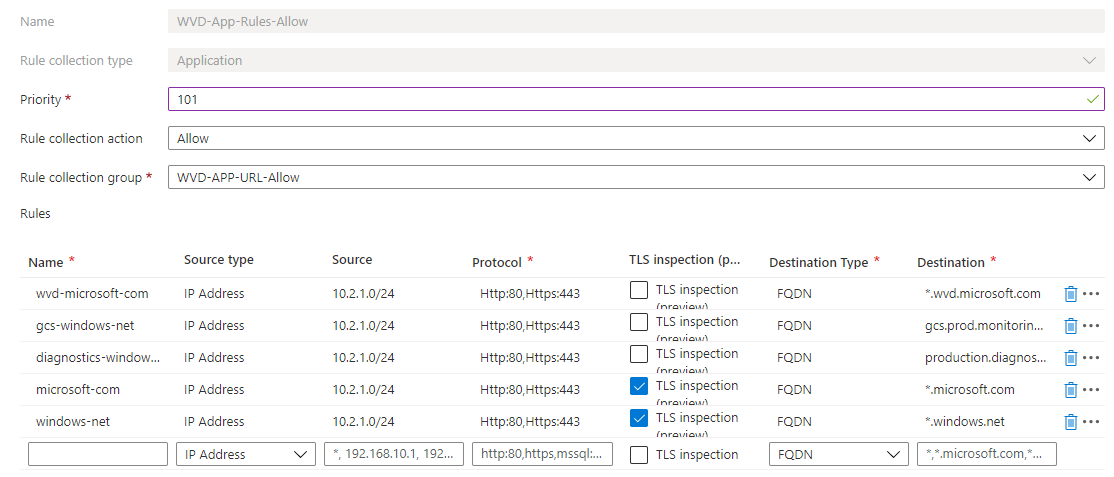
I used the commands below to configure a AVD policy.
$sourceAddress = "10.2.1.0/24"
# Create a rule collection group first
$RuleCollectionGroup = New-AzFirewallPolicyRuleCollectionGroup -Name AVD-APP-URL-ALLOW -Priority 100 -FirewallPolicyObject $AzFwPolicy

# Define rules // part of the safe-url list https://docs.microsoft.com/en-us/azure/virtual-desktop/safe-url-list
$ApplicationRule1 = New-AzFirewallPolicyApplicationRule -Name 'avd-microsoft-com' -Protocol "http:80","https:443" -TargetFqdn "*.avd.microsoft.com" -SourceAddress $sourceAddress
$ApplicationRule2 = New-AzFirewallPolicyApplicationRule -Name 'gcs-windows-net' -Protocol "http:80","https:443" -TargetFqdn "gcs.prod.monitoring.core.windows.net" -SourceAddress $sourceAddress
$ApplicationRule3 = New-AzFirewallPolicyApplicationRule -Name 'diagnostics-windows-net' -Protocol "http:80","https:443" -TargetFqdn "production.diagnostics.monitoring.core.windows.net" -SourceAddress $sourceAddress

# TLS Inspection Rules
$ApplicationRule4 = New-AzFirewallPolicyApplicationRule -Name 'microsoft-com' -Protocol "http:80","https:443" -TargetFqdn "*.microsoft.com" -SourceAddress $sourceAddress -TerminateTLS
$ApplicationRule5 = New-AzFirewallPolicyApplicationRule -Name 'windows-net' -Protocol "http:80","https:443" -TargetFqdn "*.windows.net" -SourceAddress $sourceAddress -TerminateTLS

$ApplicationRuleCollection = @{
    Name       = "AVD-App-Rules-Allow"
    Priority   = 101
    ActionType = "Allow"
    Rule       = @($ApplicationRule1, $ApplicationRule2, $ApplicationRule3,$ApplicationRule4,$ApplicationRule5)
}
# Create a app rule collection
$AppRuleCollection = New-AzFirewallPolicyFilterRuleCollection @ApplicationRuleCollection

# Deploy to created rule collection group
Set-AzFirewallPolicyRuleCollectionGroup -Name $RuleCollectionGroup.Name -Priority 100 -RuleCollection $AppRuleCollection -FirewallPolicyObject $AzFwPolicy

Web categories
The second option we have is creating rules based on web categories. In this example I will use a new rule collection group with a new application collection.
$sourceAddress = "10.2.1.0/24"
# Create a rule collection category group first
$RuleCatCollectionGroup = New-AzFirewallPolicyRuleCollectionGroup -Name AVD-APP-CATEGORY-Deny -Priority 101 -FirewallPolicyObject $AzFwPolicy

$categoryrule1 =  New-AzFirewallPolicyApplicationRule  -WebCategory 'Gambling' -Name 'Gambling' -Protocol "http:80","https:443" -SourceAddress $sourceAddress -TerminateTLS
$categoryrule2 =  New-AzFirewallPolicyApplicationRule  -WebCategory 'Games' -Name 'Games' -Protocol "http:80","https:443"  -SourceAddress $sourceAddress -TerminateTLS

# Create a app rule collection
$AppCategoryCollection = New-AzFirewallPolicyFilterRuleCollection -Name AVD-App-Categories -Priority 101 -Rule $categoryrule1,$categoryrule2 -ActionType "Deny"

# Deploy to created rule collection group
Set-AzFirewallPolicyRuleCollectionGroup -Name $RuleCatCollectionGroup.Name -Priority 101 -RuleCollection $AppCategoryCollection -FirewallPolicyObject $AzFwPolicy

Network rules
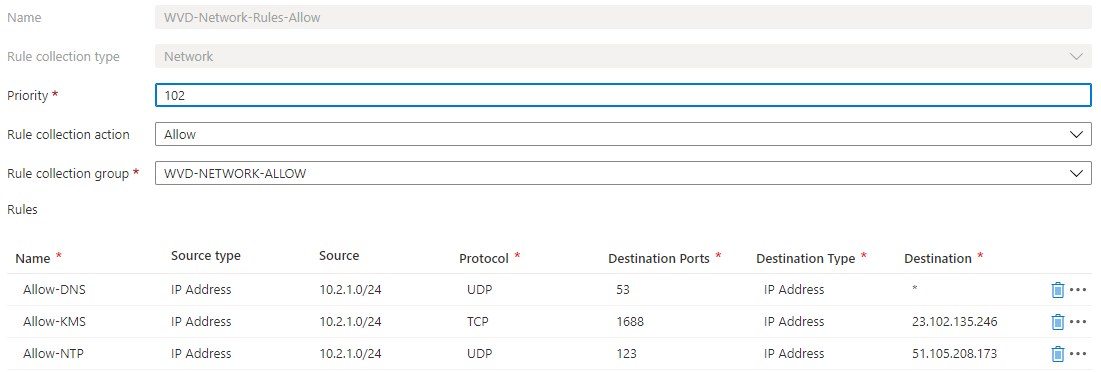
To stay supported and keeps your AVD environment working it is necesarry to add some critical network rules.
I used the code below to achieve my goal.
$sourceAddress = "10.2.1.0/24" #AVD Subnet

$RuleCollectionGroup = New-AzFirewallPolicyRuleCollectionGroup -Name AVD-NETWORK-ALLOW -Priority 104 -FirewallPolicyObject $AzFwPolicy
$Rule1Parameters = @{
    Name               = "Allow-DNS"
    Protocol           = "UDP"
    sourceAddress      = $sourceAddress
    DestinationPort    = "53"
    DestinationAddress = "*"
}
$Rule2Parameters = @{
    Name               = "Allow-KMS"
    Protocol           = "TCP"
    sourceAddress      = $sourceAddress
    DestinationPort    = "1688"
    DestinationAddress = "23.102.135.246"
}
$Rule3Parameters = @{
    Name               = "Allow-NTP"
    Protocol           = "UDP"
    sourceAddress      = $sourceAddress
    DestinationPort    = "123"
    DestinationAddress = "51.105.208.173"
}

$rule1 = New-AzFirewallPolicyNetworkRule @Rule1Parameters
$rule2 = New-AzFirewallPolicyNetworkRule @Rule2Parameters
$rule3 = New-AzFirewallPolicyNetworkRule @Rule3Parameters

$NetworkRuleCollection = @{
    Name       = "AVD-Network-Rules-Allow"
    Priority   = 102
    ActionType = "Allow"
    Rule       = @($rule1, $rule2, $rule3)
}
# Create a app rule collection
$NetworkRuleCategoryCollection = New-AzFirewallPolicyFilterRuleCollection @NetworkRuleCollection
# Deploy to created rule collection group
Set-AzFirewallPolicyRuleCollectionGroup -Name $RuleCollectionGroup.Name -Priority 104 -RuleCollection $NetworkRuleCategoryCollection -FirewallPolicyObject $AzFwPolicy
 At the end the overall situation will have a rule collection at the top with a rule collection group and then an application rule collection in the group. (I haven’t spotted in the portal where to create a collection group yet. There is a default group out of the box). I recommend creating rule collection groups per type, per allow/deny. Because rule collection groups currently can only include single rule collection type.
 At this moment there is no update command for updating the application rule collection. If you need to edit the collection then go to the portal. If the commands will be updated I will update this post as soon as possible.
Default routes
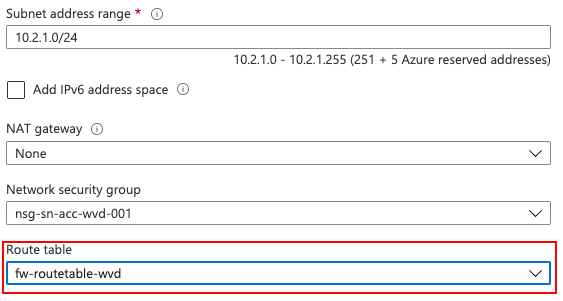
At last we will make sure that all the traffic is going through the firewall. So we need to create a default route and add the route table to the AVD subnet. I consciously choose to add the default route as a last step. This will give me all the time I need to configure the firewall before getting live.
In the code below we first make a route table. After then we will add a route to that table. The last step will add the route to the subnet.
As you can see I’m still using the networkInfo parameter at the beginning of this post.
# Create a route table
$routeTableParameters = @{
    Name = 'fw-routetable-avd'
    Location = $networkInfo.Location
    ResourceGroupName = $networkInfo.ResourceGroupName
    DisableBgpRoutePropagation = $true
}
$routeTableDG = New-AzRouteTable @routeTableParameters

# Create a route; 0-route will send all the traffic to the firewall
$routeParameters = @{
    Name = "avd-route"
    RouteTable = $routeTableDG
    AddressPrefix = 0.0.0.0/0
    NextHopType = "VirtualAppliance"
    NextHopIpAddress = $azFw.IpConfigurations.privateIpAddress
}
Add-AzRouteConfig @routeParameters | Set-AzRouteTable

# Associate the route table to the subnet
$subnetParameters = @{
  VirtualNetwork = $networkInfo
  Name = "DefaultSubnet"
  AddressPrefix = "10.2.1.0/24" #AVD Subnet
  RouteTable = $routeTableDG
}
Set-AzVirtualNetworkSubnetConfig @subnetParameters | Set-AzVirtualNetwork

Enable Log Analytics
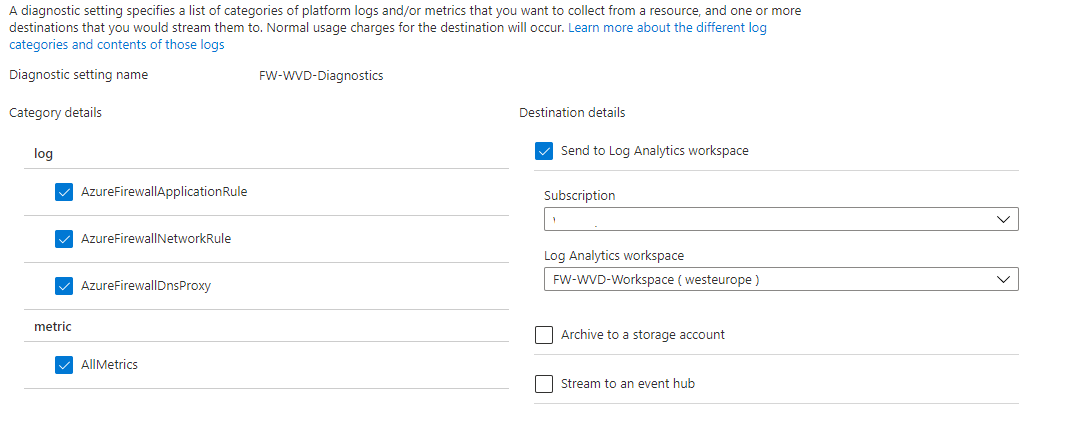
By default no diagnostic settings are enabled at the Azure Firewall. To help you gathering information it is critical to setup the diagnosics settings.
With the code below you are able to enable the diagnostic settings to a new Log Analytics Workspace. Because a firewall can generate a lot of logs and metrics, and to avoid high costs, I have set the retention to 30 days.
$WorkspaceParameters = @{
    Name = "FW-AVD-Workspace"
    ResourceGroupName = $Azfw.ResourceGroupName
    Location = $Azfw.Location
    Sku = "Standard"
}
$Workspace = New-AzOperationalInsightsWorkspace @WorkspaceParameters

$Parameters = @{
    Name = "FW-AVD-Diagnostics"
    ResourceId = $AzFw.Id
    WorkspaceId = $Workspace.ResourceId
    Enabled = $true
    RetentionEnable = $true
    RetentionInDays = 30
}
Set-AzDiagnosticSetting @parameters

Other resources
Some other resources which helped me out.
- https://azure.microsoft.com/en-us/updates/azure-firewall-premium-now-in-public-preview
- https://docs.microsoft.com/en-us/azure/firewall/protect-windows-virtual-desktop
- https://www.linkedin.com/pulse/avd-azure-firewall-premium-web-content-filtering-marco-moioli
- https://docs.microsoft.com/en-us/azure/firewall-manager/policy-overview
Thank you for reading my blog post about configuring an Azure Firewall Premium for AVD the automated way.
